Easy Tech Tuts
How to Create Stripe API & Webhook Easily Step by Step 2026
By Impran M N
Stripe API keys and webhooks work together to automate how your app responds to payment events, whether you're running an e-commerce store, a subscription service, or a SaaS platform. This guide covers finding your API keys in the Developer settings menu, then building a webhook event destination with Stripe's event destination wizard: choosing which events to listen to, picking a destination type, and setting the endpoint that receives them.
Before you start
- A Stripe account (sandbox or live) with dashboard access
- A server with a publicly reachable HTTPS endpoint ready to receive POST requests, or a tunnelling tool such as ngrok for local testing
01Open Developer settings and copy your API keys
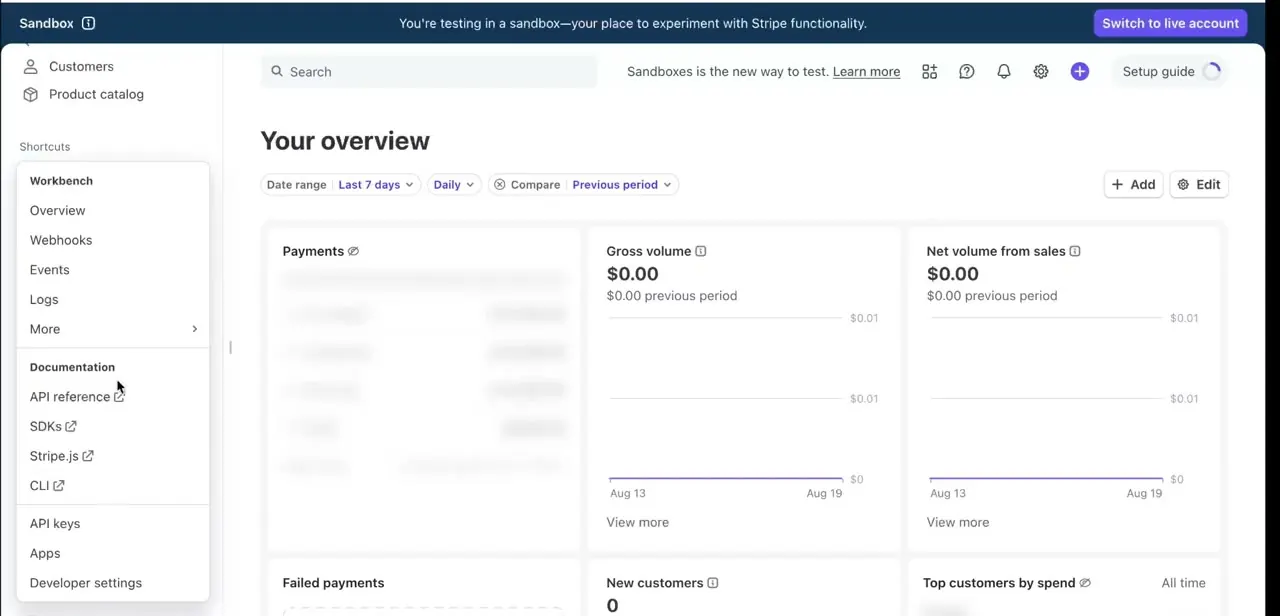
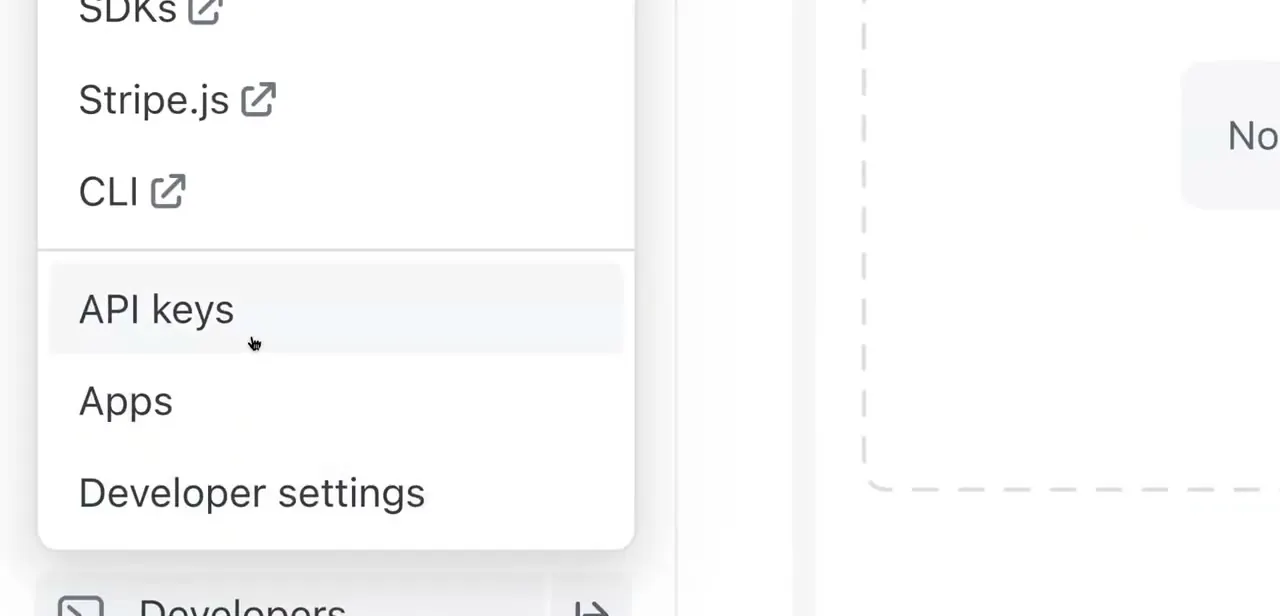
Your API keys and webhook tools live under the same developer-focused menu, reached from the developer icon in the Stripe dashboard. Inside it you'll find SDKs, Stripe.js and CLI links near the top, followed by API keys, Apps and Developer settings.
API keys and webhook destinations are managed from this same area, so it helps to know your way around it since you'll return to it whenever you rotate a key or add an integration. Click API keys to see your publishable key and secret key, each shown separately for test mode and live mode.
Test keys start with pk_test_ and sk_test_ and simulate charges and events without moving real money. Live keys start with pk_live_ and sk_live_ and process actual transactions.
Build and debug with test mode keys, then switch to live mode only when you're ready to accept real payments. Never commit a secret key to a public repository; store it in an environment variable or a secrets vault instead.
02Start an event destination and choose what it listens to
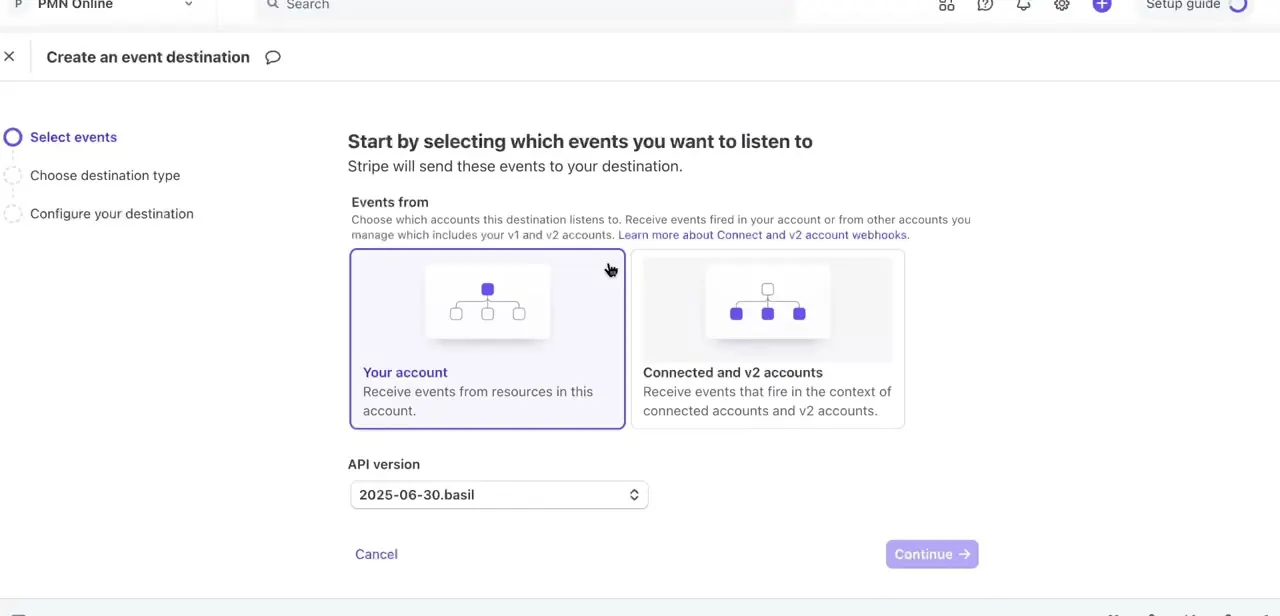
Webhooks in the current Stripe dashboard are set up through Create an event destination, a short wizard that opens with Select events. Choose whether the destination receives events from Your account only, or from Connected and v2 accounts if you're managing a Connect platform, then confirm the API version the destination should use. This matters because the shape of the event payload can change between API versions, and Stripe lets you pin a destination to an older version so your handler code doesn't break when your account's default version moves forward.
03Pick specific event types and a destination type
On the same screen, select the event types you want to send to this destination. invoice.created, payment_intent.succeeded and checkout.session.completed are common choices depending on whether you're billing subscriptions or one-off purchases. Click Continue and choose a destination type.
A webhook endpoint is the standard choice, sending an HTTPS request to your server whenever a matching event fires. Amazon EventBridge and Azure Event Grid are also available if your team already routes events through AWS or Azure infrastructure.
Stripe caps each account at 16 registered event destinations per mode. If you hit that limit while testing, delete old test destinations you no longer use before creating a new one.
04Name the destination and set the endpoint URL
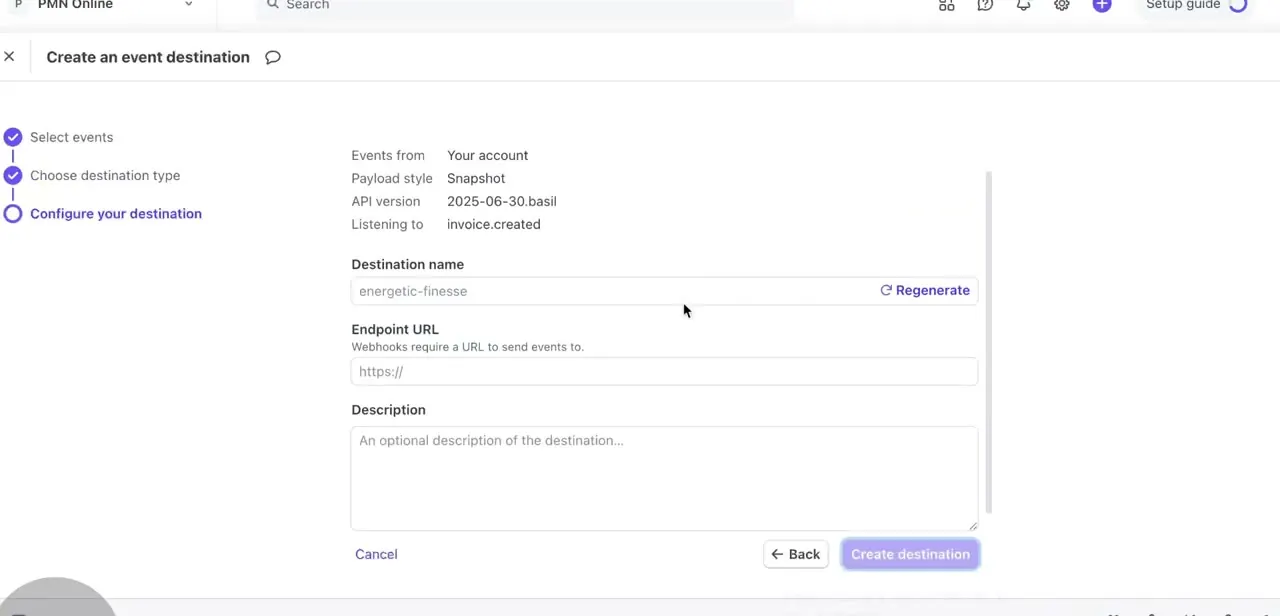
The final step summarizes your choices: account scope, payload style, API version and the events you selected. It then asks for a Destination name, an Endpoint URL, and an optional description.
Stripe suggests a random destination name, something like "energetic-finesse", that you can regenerate or replace with something meaningful. The Endpoint URL matters most: it has to be a publicly reachable HTTPS address on your server, ready to accept and parse Stripe's POST requests.
A localhost URL won't work here. Use a tunnelling tool such as ngrok, or test locally with the Stripe CLI first, then register the real public URL once your handler is deployed.
05Verify webhook signatures on your server
Once the destination is created, Stripe reveals a signing secret beginning with whsec_, specific to that one endpoint. Your server code should use this secret, together with Stripe's SDK helper, to confirm incoming requests genuinely came from Stripe instead of a spoofed source.
Skipping this check is a common gap in otherwise working integrations: anyone who finds your endpoint URL can otherwise post a fake payload shaped like a real event. Test mode and live mode each get their own signing secret, even for the same endpoint URL, so copy the one that matches the mode your handler is running against.
06Test delivery, then switch to live mode
Stripe's dashboard logs every delivery attempt to your endpoint, including the response status your server returned, which makes it easy to confirm delivery before you depend on it. Trigger a manual test event from the destination's detail page, or run stripe trigger payment_intent.succeeded from the CLI, and check that it shows as delivered. Only then switch your integration to live mode keys and the live-mode version of the same event destination.
When it doesn't work
The event deliveries tab shows "Unable to connect" or another connection error
Why: Stripe can't reach the endpoint URL. This usually means the server isn't publicly accessible yet, or the URL still points at localhost.
Fix: Deploy the handler to a public HTTPS address, or use ngrok or the Stripe CLI's forwarding command while testing locally, then update the endpoint URL.
Signature verification fails even though the request looks correct
Why: A framework's body parser has already touched the raw request body before Stripe's SDK tries to verify it. Signature checks need the exact, unmodified bytes Stripe sent.
Fix: Exempt the webhook route from any body-parsing or CSRF middleware and pass the raw body straight into the SDK's signature verification helper.
Webhooks work in test mode but not once switched to live
Why: Test mode and live mode each have a separate signing secret, even for an endpoint reusing the same URL.
Fix: Copy the signing secret from the live-mode version of the event destination and use that in the live environment variable, not the test-mode secret.
Stripe won't let a new event destination be created
Why: The account has already reached the limit of 16 registered event destinations for that mode.
Fix: Delete unused or duplicate test destinations from the Webhooks list before creating a new one.
Frequently asked questions
What's the difference between test mode and live mode for keys and webhooks?
Test mode keys and secrets are prefixed pk_test_ and sk_test_, and respond to simulated events while you build. Live mode uses pk_live_ and sk_live_ keys and a separate signing secret, and processes real events from actual customer transactions. The two modes don't share data or event destinations.
Do I need a server to set up a webhook?
Yes. You need a publicly accessible HTTPS endpoint on your server or hosting platform that can receive and process the POST requests Stripe sends to your event destination.
How do I confirm my webhook is receiving events?
Open the event destination in the dashboard and check its Event deliveries tab, which lists every attempt and the HTTP status your server returned. A manual test event from the same page confirms delivery before you rely on it in production.
Why does signature verification matter?
Without it, anyone who discovers your endpoint URL could send a fake payload that looks like a real Stripe event. Verifying the signature, using the whsec_ secret tied to that specific endpoint, confirms the request genuinely came from Stripe.
What is an "event destination" in the Stripe dashboard?
It's the current name for Stripe's webhook setup flow. You choose which events to listen to, a destination type such as a webhook endpoint, and then the name and URL that receives them.
How many event destinations can I register?
Up to 16 per mode on a single account. If you're hitting that limit during testing, remove old test destinations you no longer need.
Sources and last check
Click path and screenshots come from a walkthrough of Stripe's Create an event destination wizard recorded in 2025. The wizard steps, account-scope options, destination types, endpoint URL requirement and signing-secret prefix (whsec_) were re-checked against Stripe's official docs.stripe.com/webhooks, docs.stripe.com/keys and docs.stripe.com/event-destinations pages in September 2026. The walkthrough matched current documentation with no corrections needed; this pass added the 16-destination account limit and the fact that test and live signing secrets differ per endpoint, neither of which the original article mentioned.
About the author

Impran M N
I've been hooked on technology for as long as I can remember — especially the new tools and AI apps that seem to land every other week. Easy Tech Tuts is where I write up whatever I've just worked out: I do the task in the real product, record the screen, and turn it into the guide I wish I'd found first.