Easy Tech Tuts
How to Add Services to Squarespace Easily 2026
By Impran M N
Presenting your services clearly on your website can be the difference between a visitor booking with you or moving on to a competitor. Squarespace treats a service as just another product type in its commerce system, alongside physical goods, gift cards, and downloads — which means the setup uses the same product editor you'd use to sell anything else, with a few fields tuned for booking rather than shipping.
This guide walks through where that product type lives, what the creation form actually asks for, and how pricing and inventory settings behave differently for a service than for a physical item. It's aimed at business owners, freelancers, and consultants who want their offerings looking professional and bookable, not buried in a generic page of text.
01Find where product types live in Squarespace
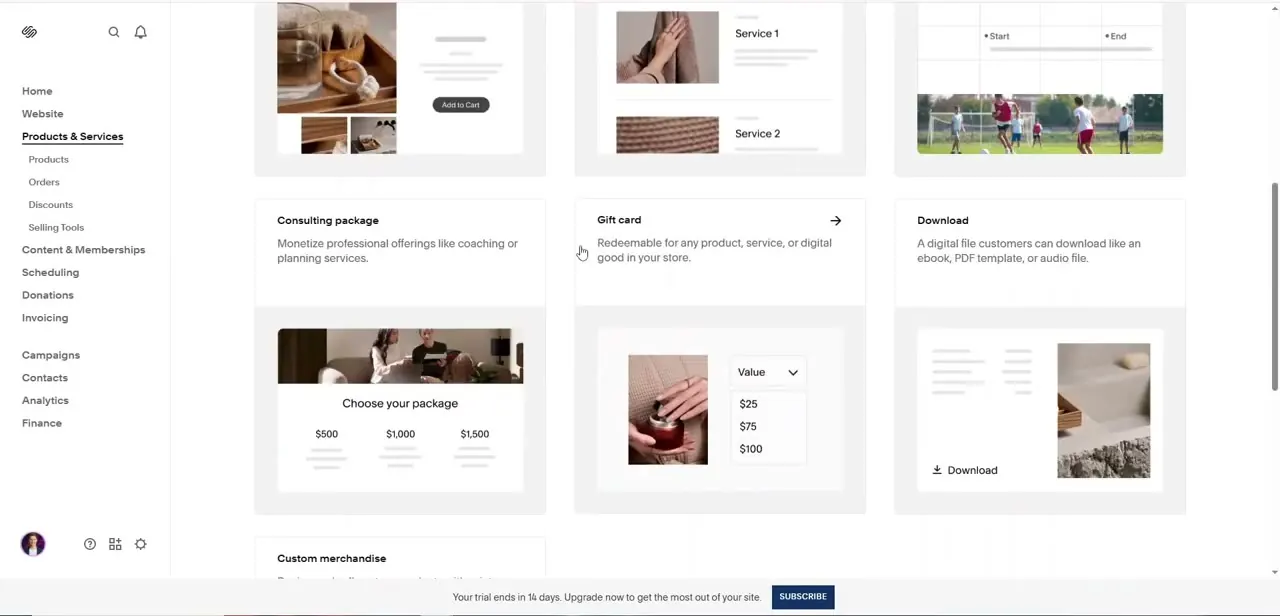
From the admin sidebar, Products & Services sits near the top, with Products, Orders, Discounts, and Selling Tools nested underneath it. Opening Products shows a gallery of product type templates rather than a blank form: a physical product card with an "Add to Cart" button, appointment-style cards labeled Service 1 and Service 2, a Consulting package card built around tiered pricing ($500, $1,000, $1,500 "Choose your package" options), a Gift card with selectable values like $25, $75, and $100, and a Download card for digital files.
Scrolling further turns up more types, including Custom merchandise. Picking the right starting template matters — a Consulting package's tiered pricing structure suits a fixed-scope offering far better than a generic service card would.
02Fill in the Create Service Product form
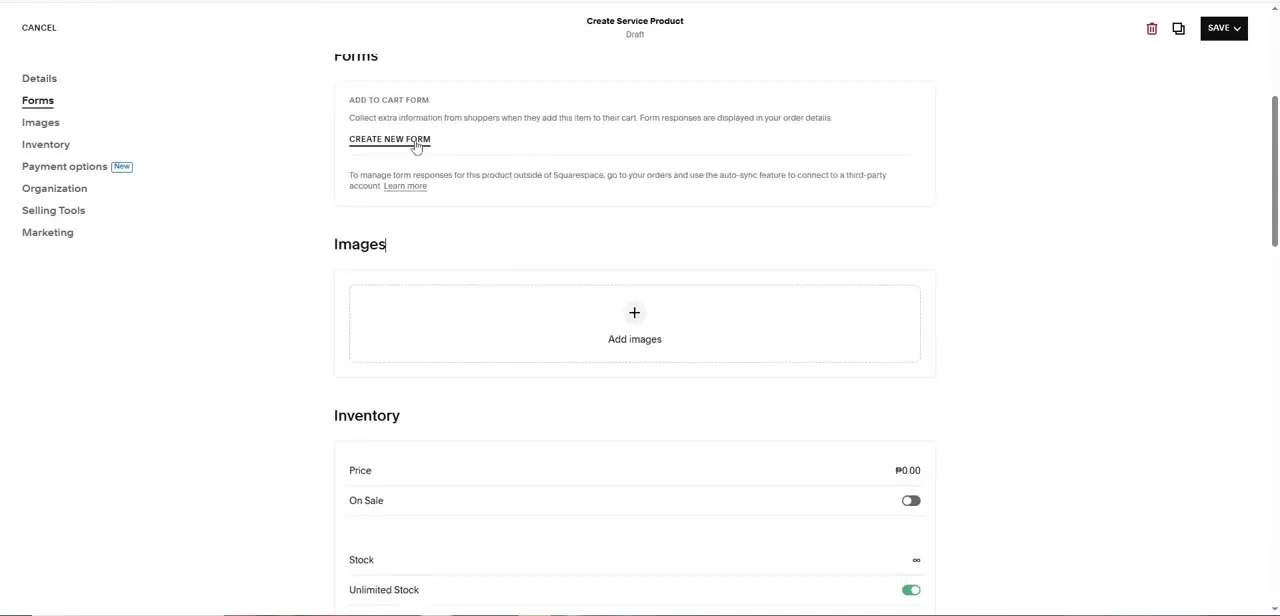
Once you pick a service-style template, the editor opens with a left-hand tab list: Details, Forms, Images, Inventory, Payment options, Organization, Selling Tools, and Marketing, with the product's status showing as Draft at the top until you publish. The Forms tab lets you attach an "Add to Cart" form to collect extra information from a client when they book — useful for asking about preferred appointment times or project details before payment. Images works the same as any product: an "Add images" tile where you upload the photos that represent the service, since a services page without visuals reads noticeably less trustworthy than one with them.
03Set pricing, stock, and payment options
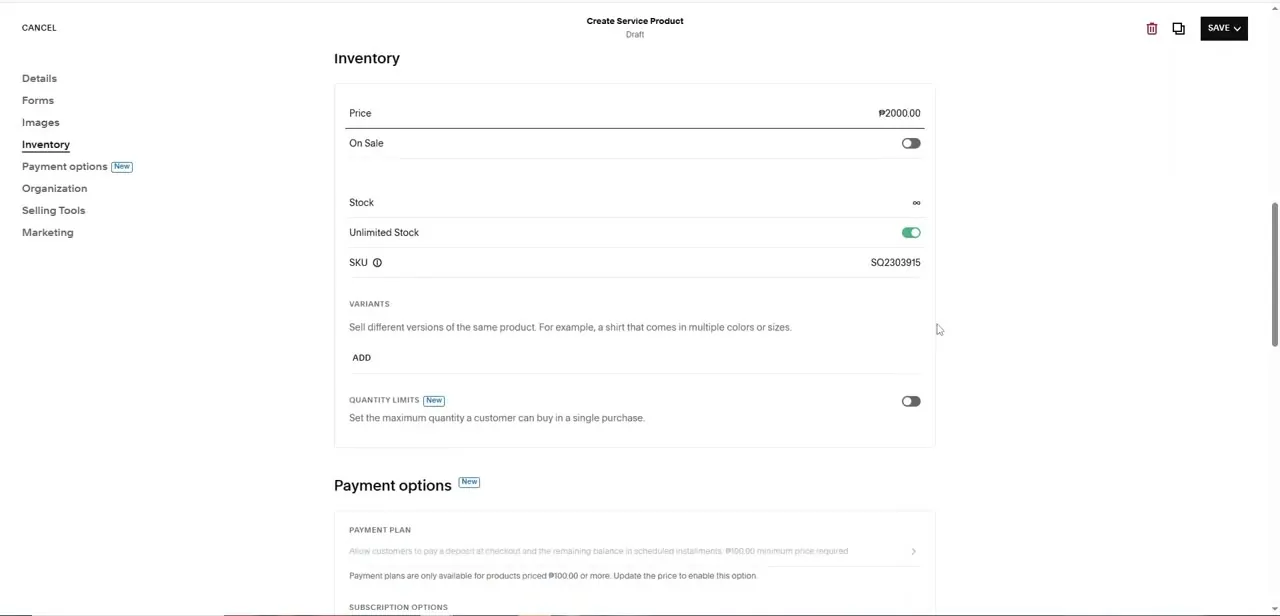
The Inventory tab is where a service product diverges most from a physical one. Price is a straightforward field — one example service is priced at ₱2,000.00 — and there's an On Sale toggle if you want to discount it temporarily.
Stock defaults to unlimited for most services, shown as an infinity symbol with an "Unlimited Stock" toggle switched on, since a consulting session or a service booking generally isn't scarcity-limited the way a physical product with 12 units in a warehouse is. Every product also gets an auto-generated SKU for your own tracking. Below Inventory, the newer Payment options section adds a Payment Plan toggle, letting a customer pay a deposit at checkout with the remaining balance billed in scheduled installments — though Squarespace requires a minimum price (₱100.00 in this case) before that option unlocks.
04Decide if you need a booking or payment integration
Squarespace's own product editor handles the listing, pricing, and checkout for a service, but it doesn't include a calendar or availability system on its own — that's what third-party tools like Calendly or Squarespace's separate Scheduling feature are for. If your service needs a client to pick a specific time slot rather than just buy and wait to be contacted, connect a scheduling tool before you publish, since retrofitting a booking flow onto a product customers are already buying creates confusion. Stripe or Squarespace Payments needs to be active on the account before any of this collects real money, the same as with any other product type.
05Publish and place the service where clients will find it
Once Details, Forms, Images, and Inventory are filled in, switch the product from Draft to published from the same SAVE menu at the top of the editor. Add the service to your site's main navigation or a dedicated Services page — a service that only exists as an unlinked product URL won't get discovered by browsing visitors, only by people who already had a direct link. If you're listing several services, group them on one Products & Services collection page so a visitor can compare offerings side by side instead of hunting through your main menu.
Frequently asked questions
Can I let clients book appointments directly from my Squarespace service pages?
The product editor itself handles listing and payment, but appointment scheduling comes from a separate tool — either Squarespace's own Scheduling feature or a third-party integration like Calendly connected to the page.
Do I need a Squarespace Commerce plan to add services?
You need commerce features active to accept payment for a service product, since Inventory, Payment options, and checkout all depend on Squarespace's commerce tools being enabled on your plan.
Does a service product need to track stock like a physical product?
No — services default to Unlimited Stock, shown as an infinity symbol in the Inventory tab, since most services aren't limited by a physical unit count the way inventory-based products are.
Can customers pay for a service in installments?
Yes, if the price meets Squarespace's minimum (₱100.00 in the example shown), the Payment options tab offers a Payment Plan letting customers pay a deposit at checkout with the rest billed in scheduled installments.
Where should I list multiple services so clients can compare them?
Group them on a single Products & Services collection page linked from your main navigation, rather than leaving each service as a standalone page a visitor has to stumble onto.
About the author

Impran M N
I've been hooked on technology for as long as I can remember — especially the new tools and AI apps that seem to land every other week. Easy Tech Tuts is where I write up whatever I've just worked out: I do the task in the real product, record the screen, and turn it into the guide I wish I'd found first.