Easy Tech Tuts
FIX: How to Change Highlights Cover on Instagram, Edit in PC, Black Cover Story 2026
By Impran M N
A highlight cover that shows up as a flat black square instead of your photo is one of the more annoying small glitches on Instagram, and it tends to show up right when you're trying to tidy up a profile for followers or clients. Most of the time it isn't a broken account at all — it's a stuck cache on the device you're editing from, or a cover image that got uploaded in a shape Instagram doesn't like. This guide walks through the actual fix: finding the edit option buried in the highlight's menu, and clearing out the app data that's usually the real culprit before you re-upload.
01Open the highlight and find the edit menu
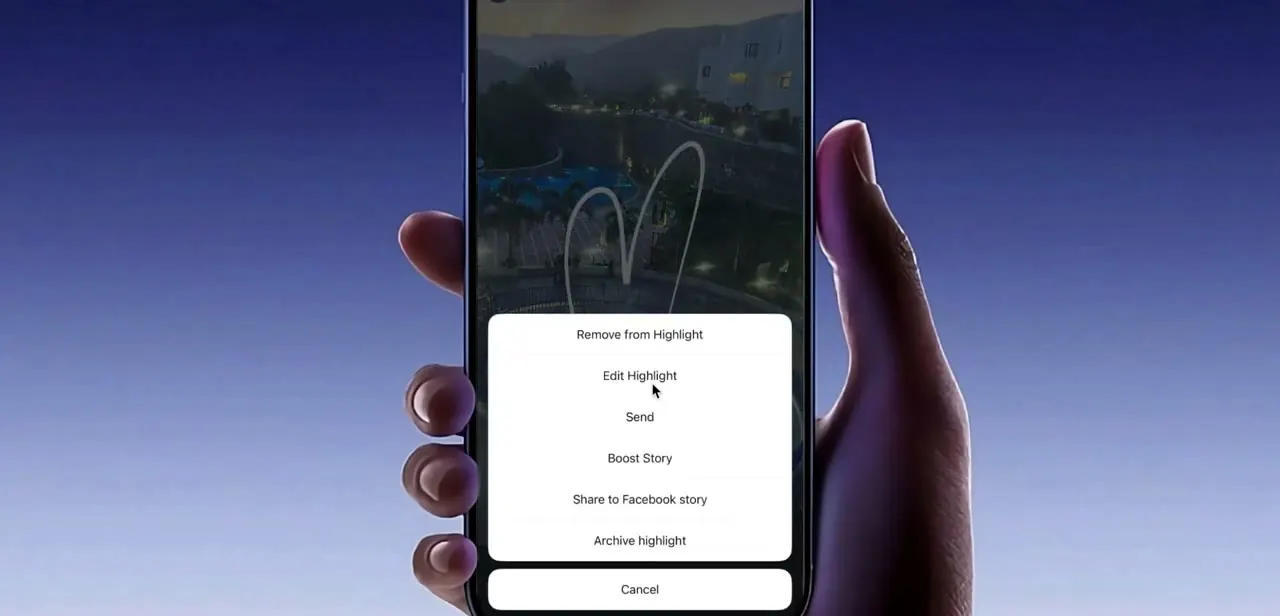
Long-press (or tap and hold) on the highlight bubble that's showing the black cover, or open the highlight itself and tap the three-dot menu while it's playing. A sheet slides up from the bottom with several options stacked in a list: Remove from Highlight, Edit Highlight, Send, Boost Story, Share to Facebook story, and Archive Highlight. Edit Highlight is the one you want — it's what lets you swap the cover image without deleting and rebuilding the whole highlight from scratch, which is the mistake a lot of people make when the cover won't display correctly.
02Check where your highlights actually live
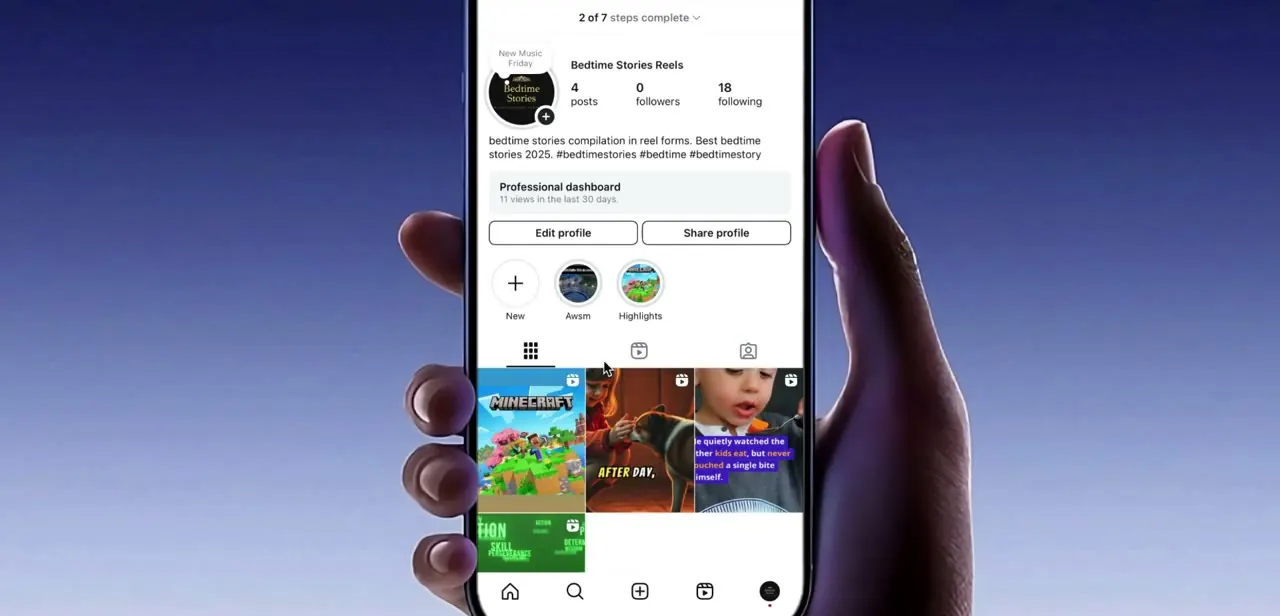
Before you start troubleshooting, confirm you're editing the right highlight from your own profile. Your highlights sit in a row just under your bio and stats — a plus-sign circle for creating a new one, followed by your existing highlight covers in order.
If a cover is showing black, it'll be obvious in this row since every other cover displays a thumbnail fine. This is also where you'll come back to check your fix once you've re-saved the cover, so it's worth having this screen open in a second tab or just remembering to swipe back to it.
03Clear the Instagram app's cached data
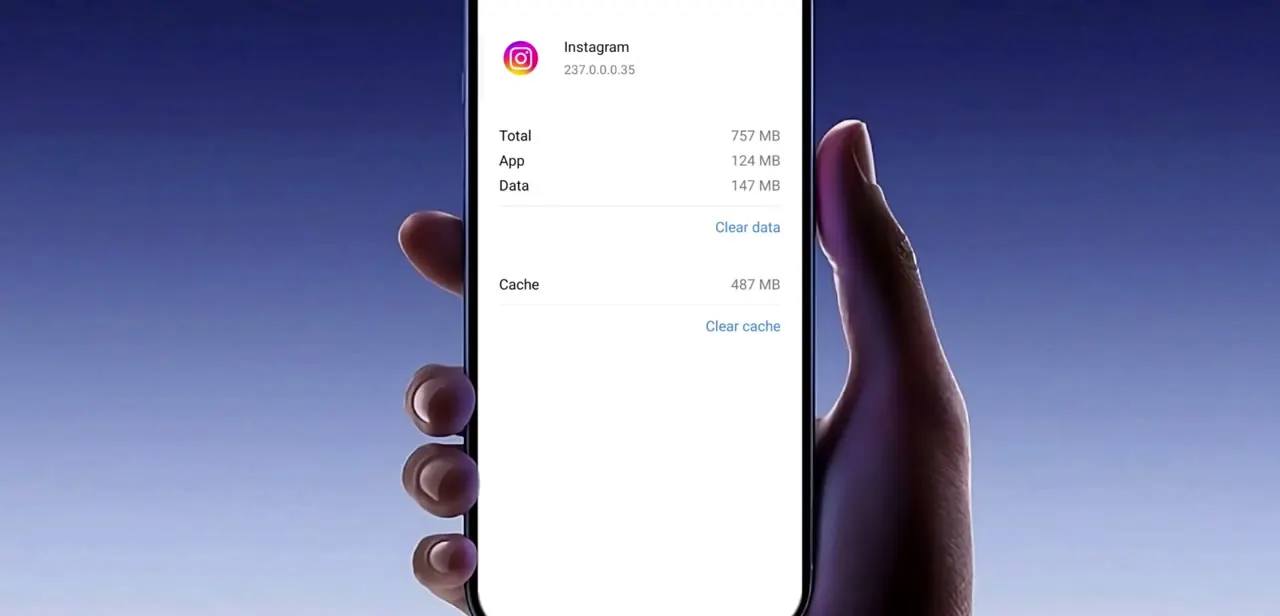
If the cover still renders black after re-selecting an image, the problem is almost always a stale cache rather than the file itself. On the device you're editing from, open its storage or app settings, find Instagram, and look for the storage breakdown showing separate Total, App, Data, and Cache figures — cache alone can run into the hundreds of megabytes on an account that's been used for a while.
Tap Clear cache first, since this only removes temporary files and won't touch your saved logins or posts. Reopen Instagram afterward and check the highlight again; clearing cache flushes out the corrupted thumbnail that was causing the black box in the first place.
04Re-upload the cover in the right shape
With the cache cleared, go back into Edit Highlight and choose a new cover image. Instagram crops highlight covers into a circle, so pick a square or near-square source image and center the part you want visible — a wide landscape photo will get cropped unpredictably and can contribute to display issues on some versions of the app. Save the change, then back out to your profile to see it render in the highlights row.
05If it's still black, try a different device or browser
Occasionally the glitch is tied to one specific app version or browser session rather than the cache. If clearing cache and re-uploading doesn't fix it, try the same edit from a different device — a phone if you were on a computer, or vice versa — since this sidesteps whatever local bug triggered the black box to begin with. Once the cover displays correctly on the second device, switch back to your primary one and it will typically have synced and resolved itself.
Frequently asked questions
Why does my highlight cover show as a black box?
It's almost always a stale local cache holding onto a broken thumbnail, or a cover image uploaded in a shape the app struggled to crop. Clearing the app's cache and re-uploading the cover resolves it in most cases.
Where do I find the option to edit a highlight cover?
Long-press the highlight bubble or open the three-dot menu while the highlight is playing, then choose Edit Highlight from the sheet that appears.
Will clearing my cache delete my Instagram data?
No. Clear cache only removes temporary files like cached thumbnails and images — it doesn't touch your login, posts, or saved data. Clear data is the more aggressive option and should be avoided unless cache alone doesn't fix it.
What size or shape should a highlight cover image be?
Use a square or near-square image, since Instagram crops highlight covers into a circle. Wide or oddly shaped source images crop unpredictably and can make the display glitch worse.
I cleared the cache and it's still black — what now?
Try editing the same highlight from a different device or app version. Once it displays correctly there, the fix typically syncs back to your original device.
About the author

Impran M N
I've been hooked on technology for as long as I can remember — especially the new tools and AI apps that seem to land every other week. Easy Tech Tuts is where I write up whatever I've just worked out: I do the task in the real product, record the screen, and turn it into the guide I wish I'd found first.