Easy Tech Tuts
How to Use Appointment Reports in GoHighLevel Easily 2026
By Impran M N
Appointment reports in GoHighLevel give you a clear picture of how your scheduling is actually performing, from bookings to cancellations to no-shows, once you know where the report lives and how to set its date range. This guide walks through the Reporting section's layout, the Appointment report tab specifically, and the metrics tiles it surfaces — Booked, Confirmed, Cancelled, No-show, and more. It's built for small business owners and marketers who want appointment data to actually inform decisions rather than sit unused in a tab they never open.
01Open the Reporting section
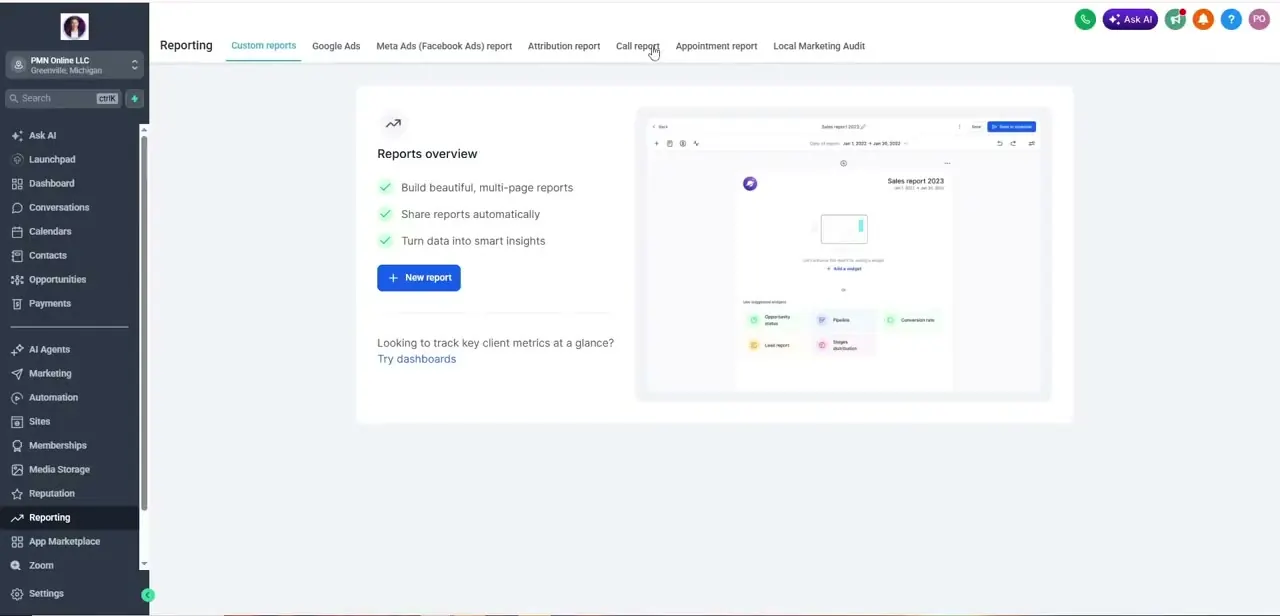
Reporting sits in the left sidebar below Memberships and Media Storage. Landing here defaults to the Custom reports tab, which shows an overview panel explaining what the reporting tools can do — build multi-page reports, share them automatically, and turn data into insights — along with a New report button. Along the top, a row of tabs breaks reporting into specific areas: Custom reports, Google Ads, Meta Ads (Facebook Ads) report, Attribution report, Call report, Appointment report, and Local Marketing Audit.
02Click into Appointment report and set your date range
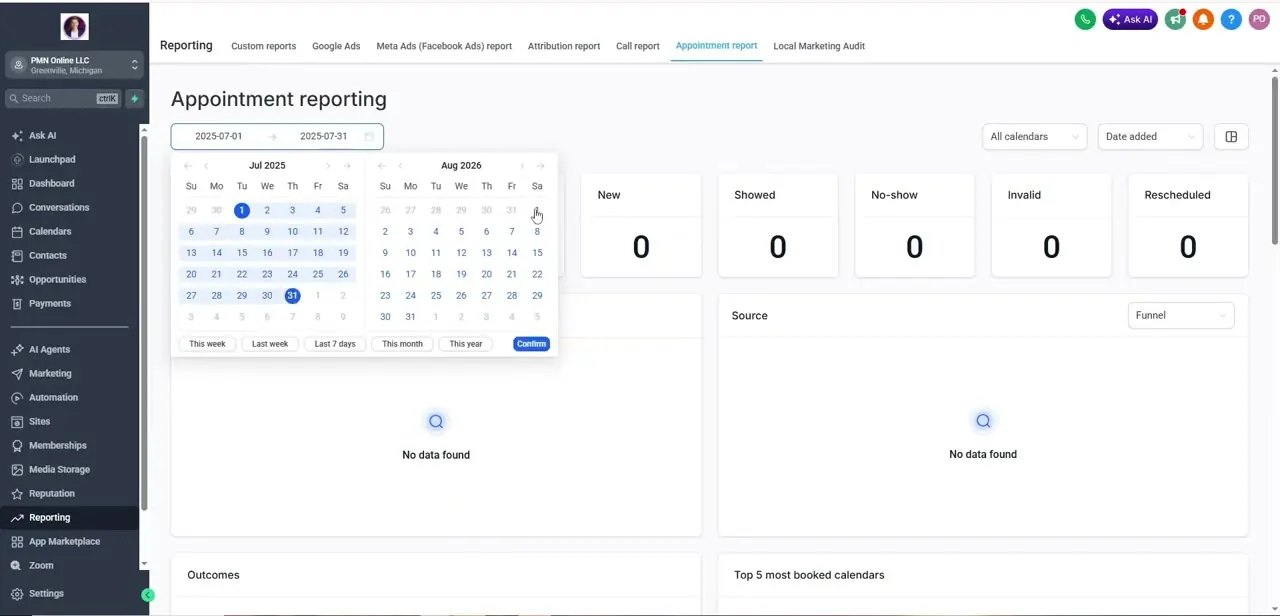
Selecting Appointment report opens a page headed "Appointment reporting" with a date range field near the top left, defaulted to a recent window. Clicking it opens a two-month calendar picker with quick presets — This week, Last week, Last 7 days, This month, This year — alongside manual date selection, plus a Confirm button to lock in the range. A dropdown next to it, All calendars, lets you scope the report to a single calendar instead of every booking source combined.
03Read the metrics tiles across the top
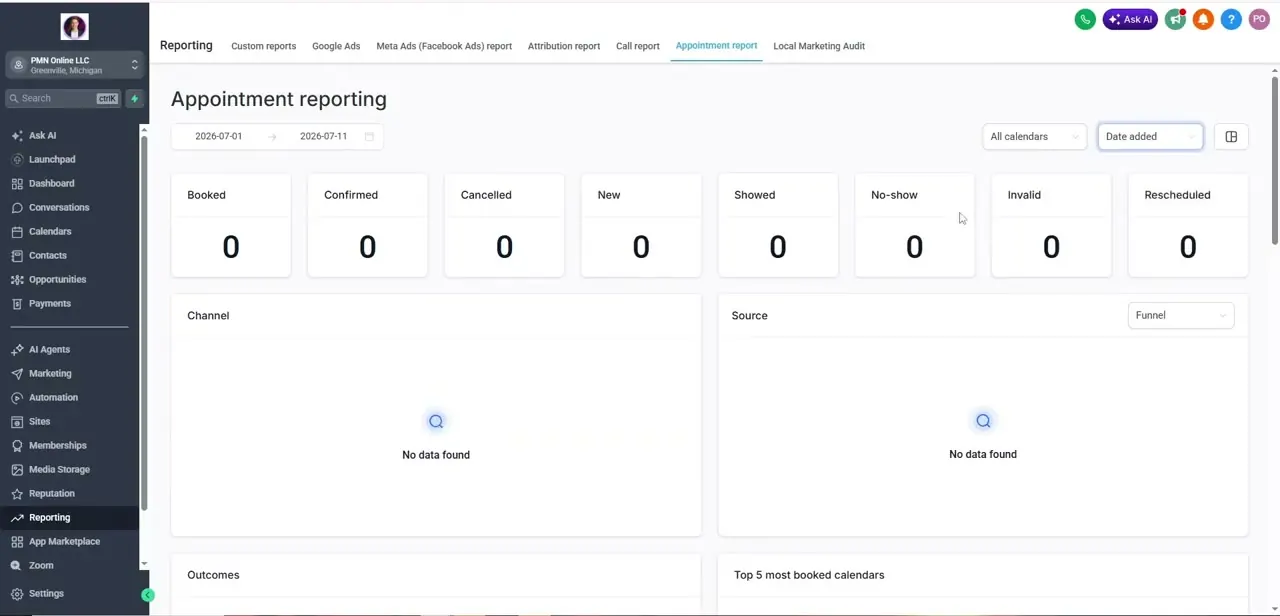
Once a range is set, a row of tiles summarizes the period at a glance: Booked, Confirmed, Cancelled, New, Showed, No-show, Invalid, and Rescheduled, each showing a raw count. On a fresh account or a quiet date range these all read zero, but on an active calendar this row is the fastest way to spot a problem — a high No-show count relative to Showed, for instance, is the clearest signal that reminder timing or confirmation messaging needs attention.
04Break the numbers down by Channel and Source
Below the metrics tiles, two side-by-side panels labeled Channel and Source (the latter filterable by Funnel) show where appointments are coming from once data exists — which booking channel or marketing source is driving bookings versus which ones are underperforming. This is the layer that turns a raw appointment count into something actionable: knowing a specific funnel is generating bookings that don't show up tells you to fix that funnel's confirmation flow, not your calendar in general.
05Check Outcomes and Top 5 most booked calendars
Further down the page, an Outcomes panel and a Top 5 most booked calendars panel round out the report. Outcomes groups what ultimately happened to each appointment, while the Top 5 panel is useful the moment you're running more than one calendar — for a team or multi-location business, it quickly shows which calendar is carrying the most volume, which can inform staffing or marketing spend decisions without digging through each calendar individually.
06Make checking this report a regular habit
The report itself only helps if it's opened more than once. Set a recurring reminder — weekly is reasonable for most service businesses — to revisit the Appointment report tab, adjust the date range to the prior period, and scan the metrics row for anything that shifted. Catching a rising No-show count or a Channel that stopped converting early is far cheaper than discovering it a quarter later in a broader revenue review.
Frequently asked questions
Where is the Appointment report in GoHighLevel?
Go to Reporting in the left sidebar, then click the Appointment report tab in the row of report types across the top, next to Call report and Local Marketing Audit.
What does an appointment report in GoHighLevel actually show?
A metrics row covering Booked, Confirmed, Cancelled, New, Showed, No-show, Invalid, and Rescheduled counts for your chosen date range, plus breakdowns by Channel, Source, Outcomes, and your top calendars by volume.
How can appointment reports help reduce no-shows?
Watching the No-show tile relative to Showed over successive date ranges helps you catch a rising trend early, so you can adjust reminder timing or confirmation messaging before it becomes a bigger revenue problem.
Can I filter the report to a specific calendar?
Yes. The All calendars dropdown next to the date range lets you scope the report to one calendar instead of combining every booking source, which is useful once the Top 5 most booked calendars panel shows you have several active.
Can I use appointment data to plan staffing needs?
Yes. Reviewing the Top 5 most booked calendars panel alongside booking trends over time can inform decisions about where to add staff or shift resources based on which calendars carry the most demand.
About the author

Impran M N
I've been hooked on technology for as long as I can remember — especially the new tools and AI apps that seem to land every other week. Easy Tech Tuts is where I write up whatever I've just worked out: I do the task in the real product, record the screen, and turn it into the guide I wish I'd found first.