Easy Tech Tuts
How to Connect GoDaddy to HubSpot, Integrate Domain Easily 2026
By Impran M N
If your domain is registered with GoDaddy, connecting it to HubSpot means starting the process from HubSpot's side, generating the DNS values it needs, and then updating your zone back in GoDaddy's control panel. HubSpot never touches your registrar directly — it hosts the content and issues the SSL certificate, but the actual DNS records live wherever your domain is registered. This guide walks through HubSpot's domain settings and connection wizard step by step, then covers what happens on the GoDaddy side to finish the handshake.
01Open your account Settings
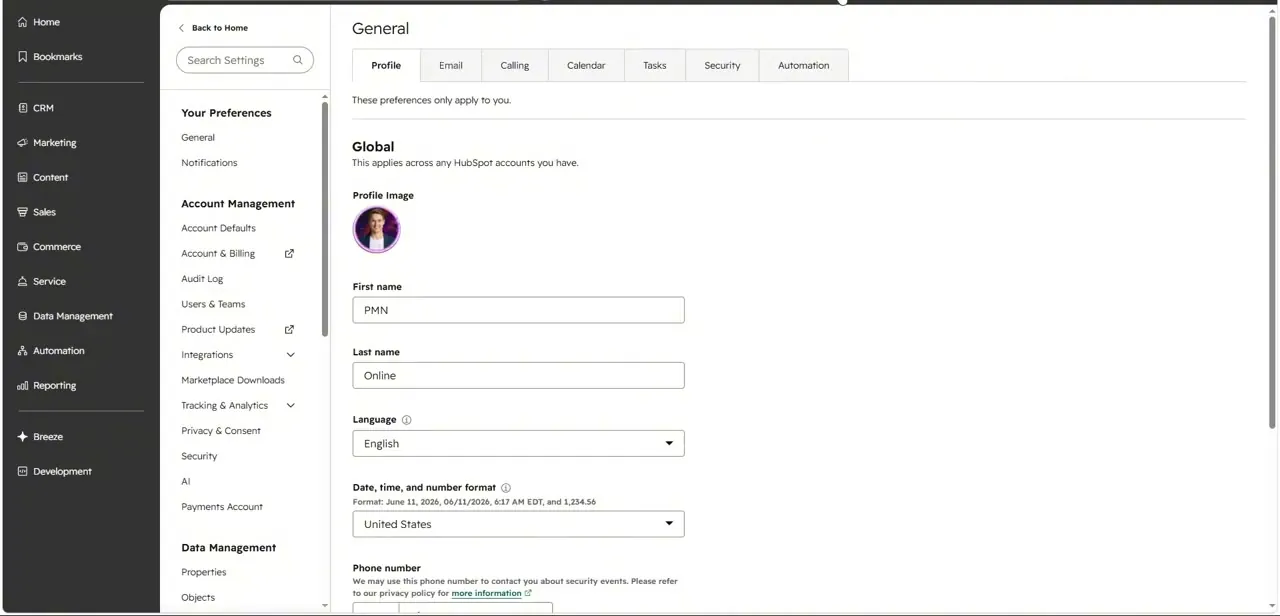
From the HubSpot home screen, click the gear icon to open Settings, which opens on your personal Profile preferences by default — first name, last name, language, and date format. The real destination is a few clicks deeper: the left rail here groups Your Preferences at the top, then Account Management with Account & Billing, Users & Teams, and Integrations, and further down a Data Management section that holds Domains & URLs. It's easy to get stuck on this Profile screen since it's the landing tab, so look specifically for Content under Data Management rather than anything under Account Management.
02Go to Domains & URLs and review Web Hosting
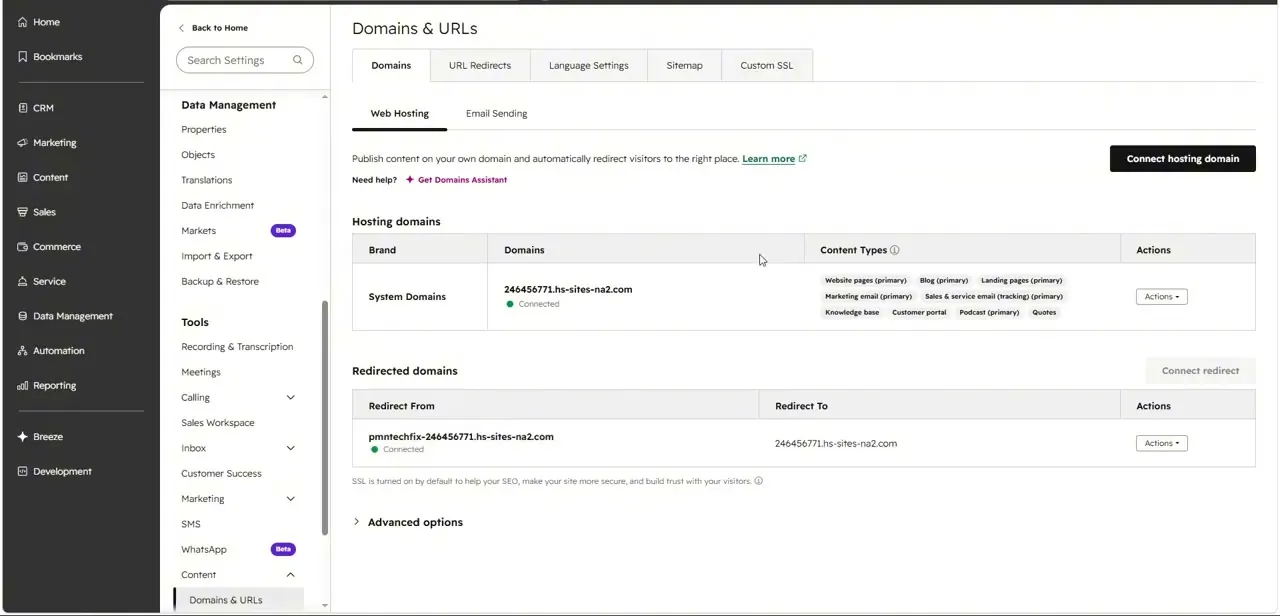
Inside Domains & URLs, the Domains tab splits into Web Hosting and Email Sending sub-tabs, and Web Hosting is where content-serving domains live. A fresh account already shows a default System Domain, something like a random string ending in .hs-sites-na2.com, connected and serving your website pages, blog, landing pages, and marketing email by default. Below that, a Redirected domains table lists any domain currently pointed at that system domain — this is the table your GoDaddy domain will eventually join once it's connected and verified.
03Start the Connect a hosting domain wizard
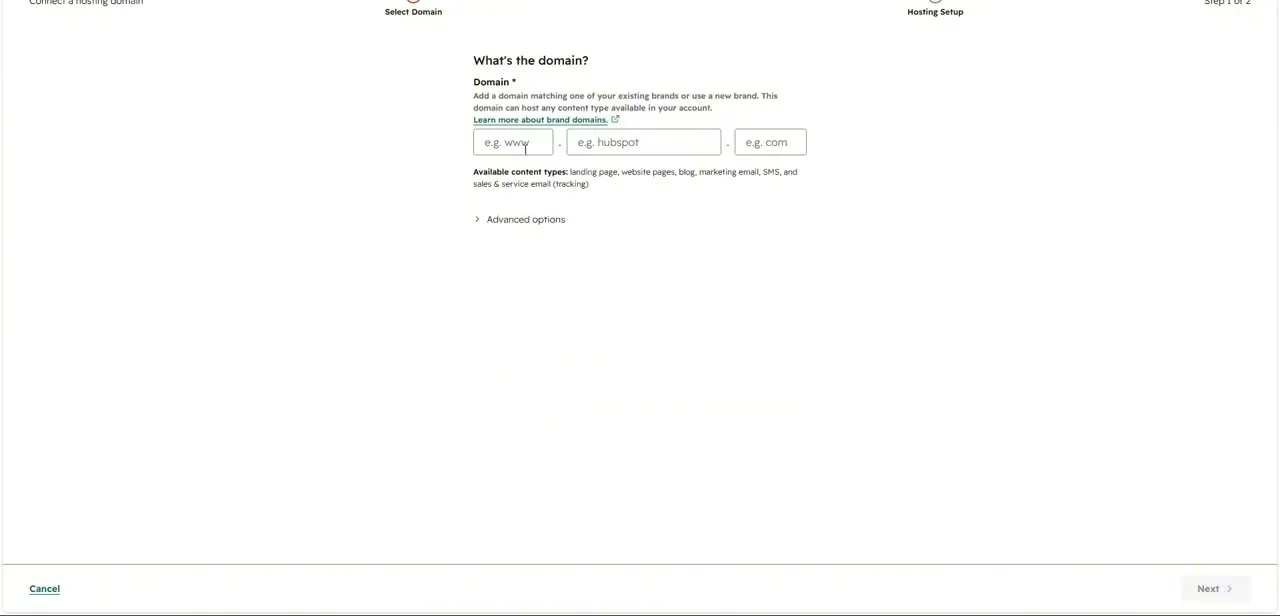
Clicking Connect hosting domain in the top right opens a two-step wizard, starting with Select Domain. The first screen asks "What's the domain?" with three separate fields for the subdomain prefix (like www or blog), the core brand name, and the extension, plus a note that this domain can host any content type available in your account — landing pages, website pages, blog, marketing email, SMS, and sales and service email tracking. An Advanced options link sits below the fields for anyone who needs to override the defaults, like assigning a non-standard content type mix.
04Assign content types and finish Hosting Setup
After entering the domain, the wizard moves to its second step, Hosting Setup, where you confirm which content types this specific domain will serve — for example, dedicating a blog subdomain to just the blog and knowledge base rather than every content type in the account. Once confirmed, HubSpot generates the DNS values your domain needs: typically a CNAME record for a subdomain, or an A record with a specific IPv4 address if you're pointing a root domain. These values are what you'll carry over to GoDaddy in the next step, so keep this screen open or copy the values somewhere before navigating away.
05Update the matching records in GoDaddy
With the CNAME or A record values in hand, log into your GoDaddy account and open the Domain Portfolio for the domain in question, then find its DNS management panel. Add the new record HubSpot generated, matching the type exactly — CNAME for a subdomain alias, A record with the IP for a root domain — and remove any conflicting legacy record pointing that same name somewhere else, since two records for the same host name will cause unpredictable routing. GoDaddy applies changes to its own DNS servers quickly, but full propagation across the internet's resolvers can still take anywhere from a few minutes to a few hours.
06Return to HubSpot and verify
Back in the Domains & URLs wizard or the domain's row in the table, trigger a live verification check once you believe the DNS change has propagated. HubSpot checks that the record resolves the way it expects and, once verification passes, automatically begins provisioning an SSL certificate for the domain — no separate certificate purchase or upload required. If verification fails, double check the exact record type and value against what GoDaddy shows in the zone file, since a typo in the CNAME target or A record IP is the most common reason a connection stalls here.
Frequently asked questions
Do I manage DNS in HubSpot or GoDaddy?
DNS records still live in GoDaddy's control panel. HubSpot's Domains & URLs wizard only generates the CNAME or A record values you need to enter there.
Will my GoDaddy domain get SSL automatically?
Yes. Once HubSpot's verification check passes, it automatically begins provisioning an SSL certificate for the connected domain with no separate purchase needed.
What DNS record type do I need for a subdomain?
Subdomains like www or blog typically use a CNAME record pointing to the value HubSpot generates. A root domain instead uses an A record with a specific IPv4 address.
Where do I start the domain connection process?
In HubSpot, open Settings, then Content, then Domains & URLs, and use the Connect hosting domain button under the Web Hosting tab.
Why is my domain not verifying after I updated GoDaddy's DNS?
Check that the record type and value exactly match what HubSpot generated, remove any conflicting legacy record for the same host name, and allow time for propagation before retrying verification.
About the author

Impran M N
I've been hooked on technology for as long as I can remember — especially the new tools and AI apps that seem to land every other week. Easy Tech Tuts is where I write up whatever I've just worked out: I do the task in the real product, record the screen, and turn it into the guide I wish I'd found first.