Easy Tech Tuts
How to Get the Freshdesk Widget
By Impran M N
The Freshdesk web widget puts a support chat panel right on your website, so visitors can message you or search help content without leaving the page. Setting it up walks through a short wizard — Customize, Preview, Launch — followed by a deeper Widget Configuration screen for anyone who wants more control than the defaults. This guide follows that actual flow, from the first branding screen through the appearance and profile settings, so you know exactly what each step changes before you put the code live.
01Start the widget setup from Admin > Web Chat
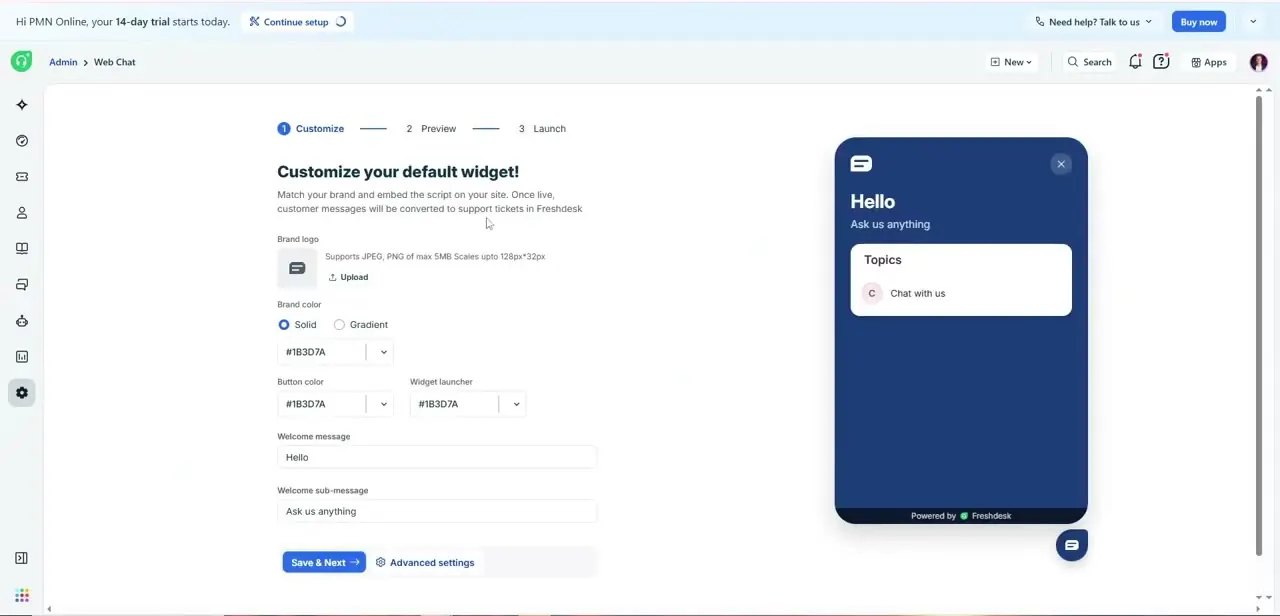
In your Freshdesk admin, open Web Chat to reach the "Customize your default widget!" screen, the first stage of a three-step flow shown across the top: Customize, Preview, Launch. This is where you set the brand logo, brand color, button color, and widget launcher color, plus the welcome message and sub-message that greet a visitor. A live preview panel on the right updates as you type, showing the widget exactly as it'll appear on your site — in this case a dark blue panel with a "Hello / Ask us anything" greeting and a Topics list.
02Open Widget Configuration for full control
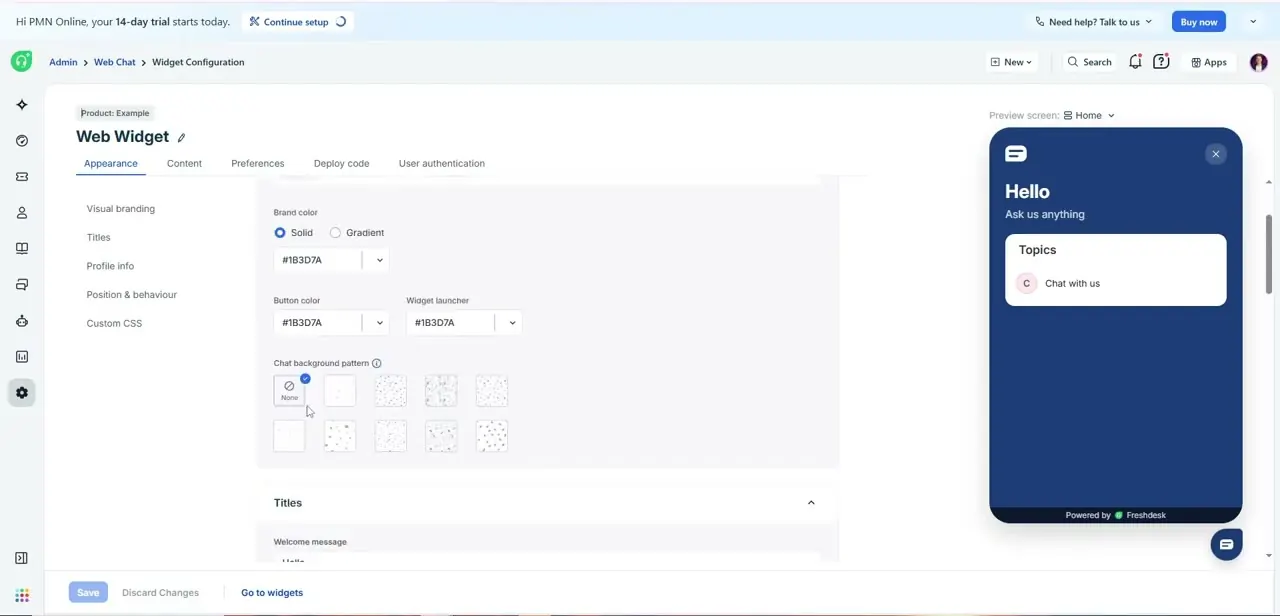
Beyond the quick customize wizard, Freshdesk has a separate Widget Configuration page reachable via Admin > Web Chat > Widget Configuration, organized into tabs: Appearance, Content, Preferences, Deploy code, and User authentication. The Appearance tab is where the real detail lives — a left-hand list breaks it into Visual branding, Titles, Profile info, Position & behaviour, and Custom CSS, so you're not scrolling one long form. One option worth knowing about here is the chat background pattern grid, which lets you pick a subtle texture behind the conversation instead of a flat color.
03Set your profile info and position
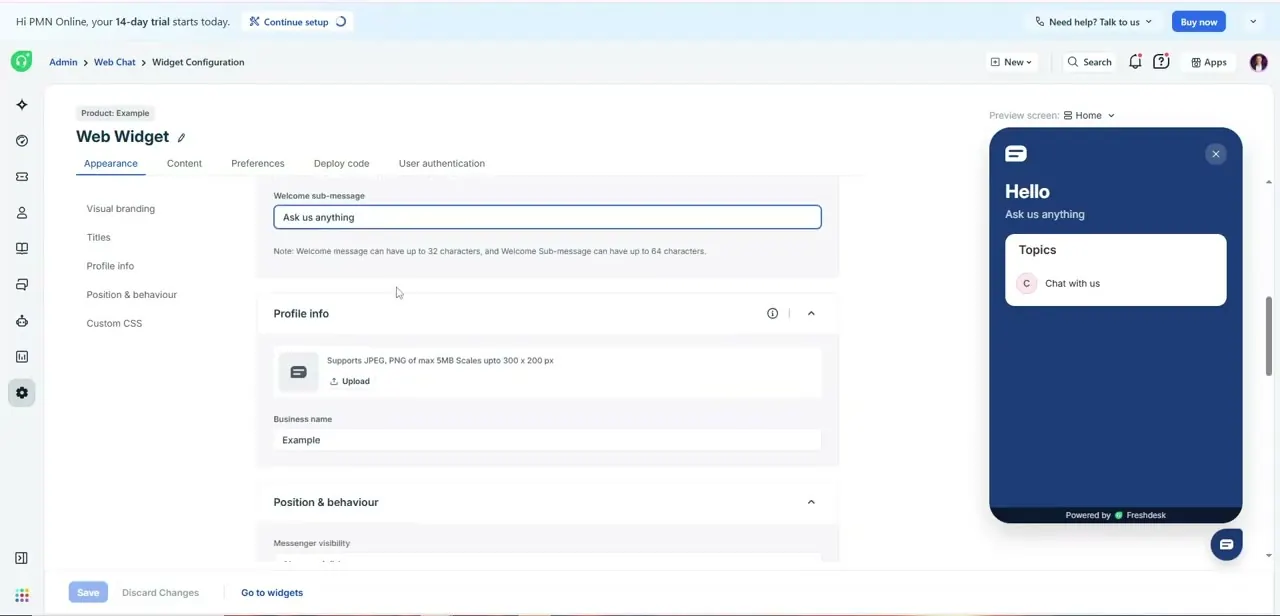
Scrolling further down Appearance reaches Profile info, where you upload a small logo and set the Business name that appears in the widget header — in the preview it reads "Example" until you replace it with your actual brand name. Right below that is Position & behaviour, which controls things like messenger visibility — whether the widget launcher shows on every page or only specific ones. These two sections are what make the widget feel like it belongs to your business rather than a generic Freshdesk demo.
04Choose what the widget shows: contact form or help content
The Content tab next to Appearance is where you decide what visitors actually see inside the widget — a contact form for submitting a ticket, links into your knowledge base articles, or both together as Topics the way the preview shows a "Chat with us" option. Decide this before you spend time on colors, since it changes how much configuration the widget needs; a widget that only shows help articles needs a populated knowledge base behind it, while a pure contact-form widget doesn't.
05Grab the embed code from Deploy code
Once appearance and content are set the way you want, open the Deploy code tab. It generates a small JavaScript snippet tied to your account and this specific widget configuration.
Copy that snippet and paste it into your site's HTML, typically just before the closing body tag, so it loads on every page you want the widget to appear on. Save your changes in Freshdesk first — the Save and Discard Changes buttons sit at the bottom of the configuration panel — or the embed code won't reflect your latest branding.
06Preview and launch before you rely on it
Before pointing real traffic at the widget, use the Preview step from the original three-stage wizard to click through it as a visitor would, checking that colors render correctly and the welcome message isn't cut off. Once it looks right, Launch makes it live. If you hit an error while saving — Freshdesk will show a red banner reading something like "Error while updating widget details" — re-check required fields like brand color before retrying, since a missing value is the most common cause.
Frequently asked questions
What does the Freshdesk widget do?
It's an embeddable chat panel that lets website visitors submit support tickets, browse help articles, or both, without leaving your site.
Do I need to code to get the widget?
You don't need to build the widget itself — Freshdesk generates it through the Customize and Widget Configuration screens — but you do need to paste the provided embed code from the Deploy code tab into your site's HTML.
Can I customize how the widget looks?
Yes. The Appearance tab covers brand colors, chat background patterns, titles, profile info like your business name and logo, and position and behavior settings.
Where do I find the widget's embed code?
Open Admin > Web Chat > Widget Configuration and go to the Deploy code tab, which generates the script to paste into your website.
Why am I seeing an error while saving widget details?
This usually happens when a required field, like brand color, is left blank or invalid. Check the highlighted fields and re-save rather than assuming it's a Freshdesk outage.
About the author

Impran M N
I've been hooked on technology for as long as I can remember — especially the new tools and AI apps that seem to land every other week. Easy Tech Tuts is where I write up whatever I've just worked out: I do the task in the real product, record the screen, and turn it into the guide I wish I'd found first.