Easy Tech Tuts
How to Create a Knowledge Base in Zendesk Easily 2026
By Impran M N
Every support team eventually hits the same wall: the same three questions keep landing in the ticket queue, and answering them one by one doesn't scale. Zendesk's Knowledge base (Guide) turns those repeat answers into a searchable Help Center article your customers can find themselves. This guide walks through the actual setup path — checking your Admin Center status, creating your first category, and writing an article with the right visibility settings — so the structure holds up as you add more content later.
01Check your Admin Center setup
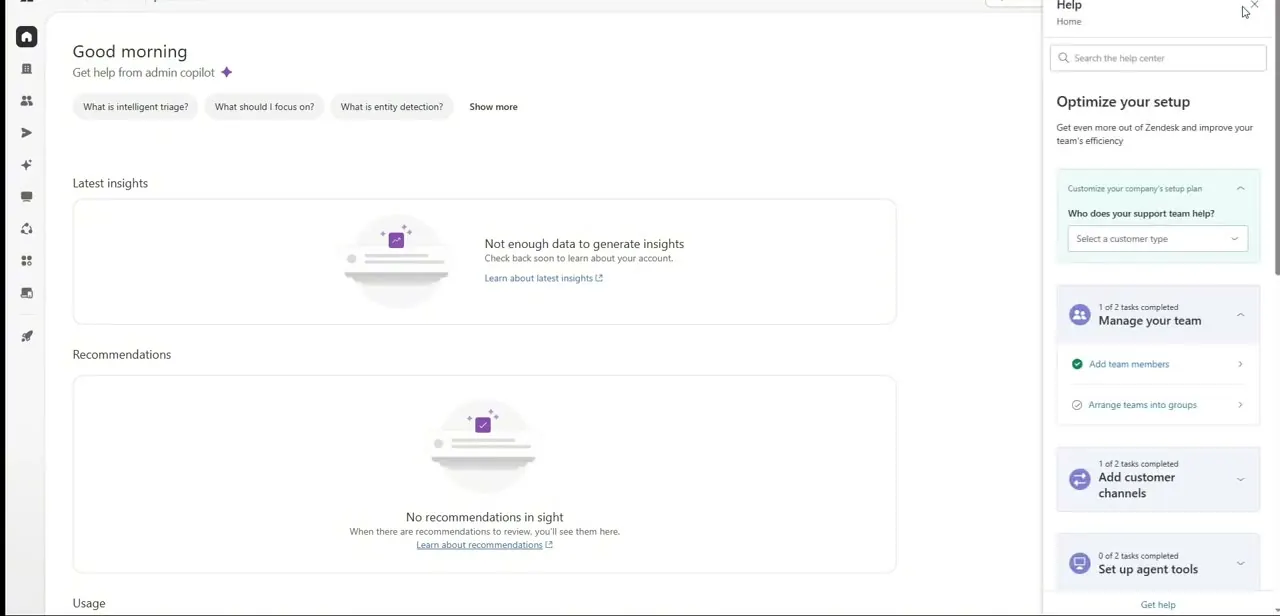
Before building out content, it's worth a stop in Admin Center's home screen, which greets you with a "Good morning" header, an admin copilot you can ask setup questions, and a running checklist of onboarding tasks — Manage your team, Add customer channels, Set up agent tools. This isn't the knowledge base itself, but it's a useful gut check: if "Set up agent tools" still shows 0 of 2 tasks completed, for instance, it's a sign your account has other foundational setup to finish alongside your Help Center.
02Create your first category
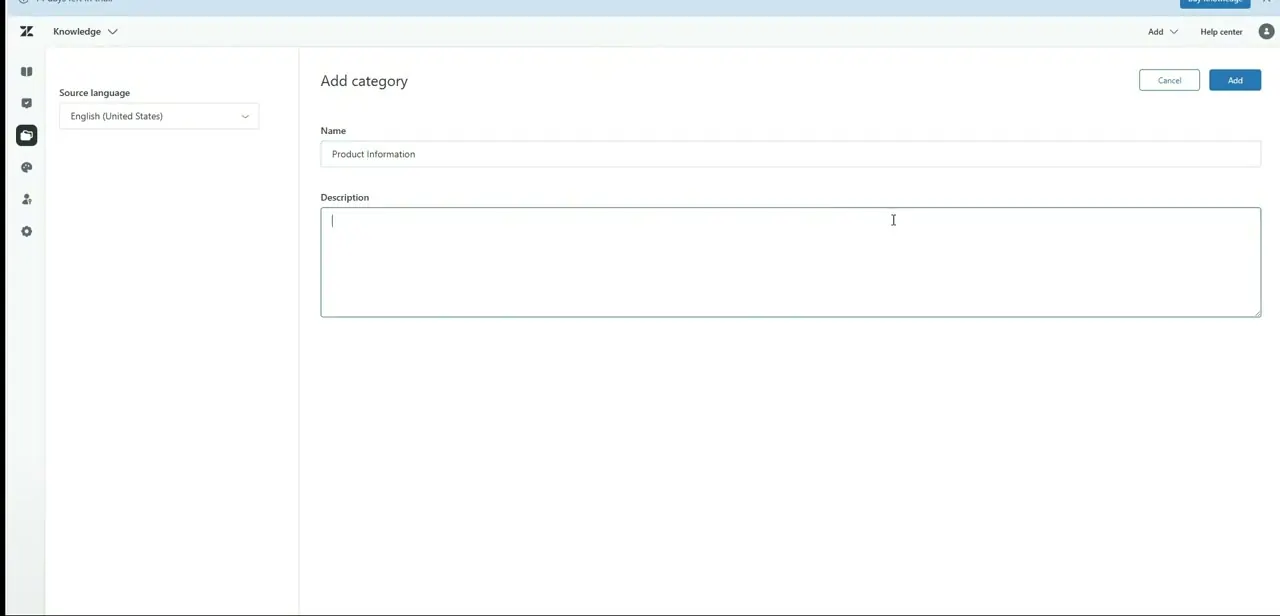
Inside the Knowledge (Guide) admin area, click Add and choose Add category. The form is short: a Name field and a Description field, plus a Source language selector so you know which language variant you're editing if your Help Center supports more than one. Categories are the top level of your knowledge base's structure — think of them as the main folders customers browse first, like "Product Information," "Billing," or "Getting Started" — so name them around how customers actually think about your product, not around your internal team structure.
03Add sections inside the category
Once a category exists, it needs sections underneath it before articles have somewhere to live — a "Product Information" category might break down into sections like "Setup," "Troubleshooting," and "FAQs." Sections give your Help Center a second layer of organization so customers aren't scrolling through a flat list of every article in a category at once. Keep this layer shallow; two levels (category, then section) is usually enough for most support content, and going deeper tends to bury articles instead of organizing them.
04Write your first article
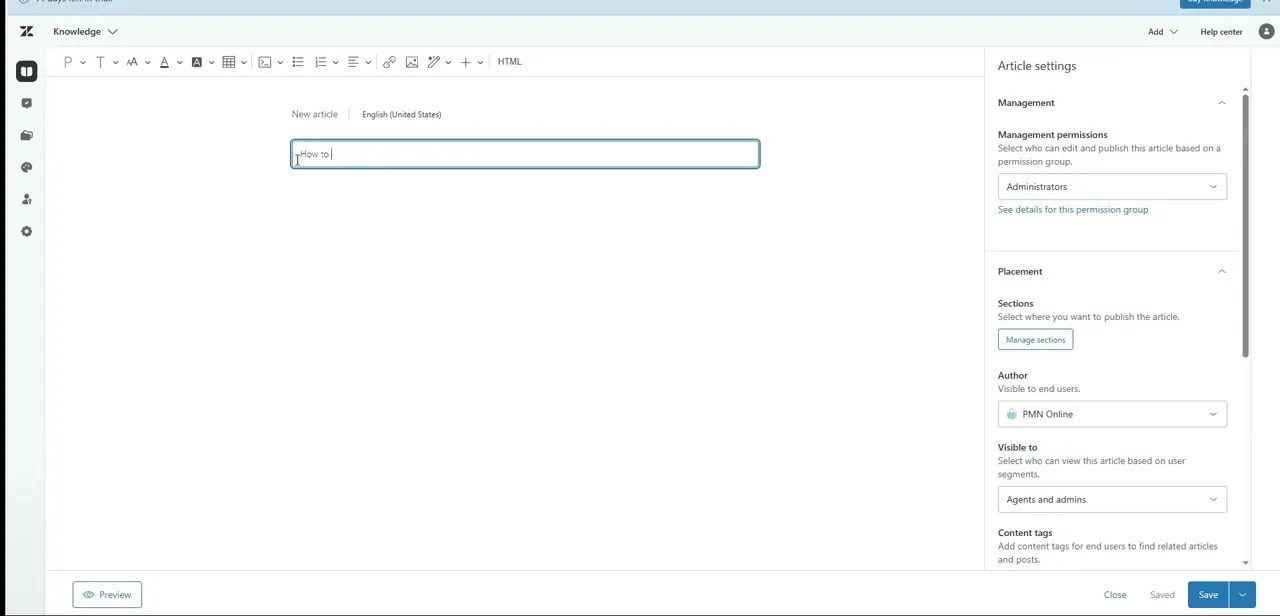
From the Knowledge admin area, start a new article. The editor opens with a title field — start typing something specific like "How to reset your password" rather than a vague label — and a full formatting toolbar above it for headings, text styling, links, images, tables, and embeds. On the right, the Article settings panel controls who can edit it (Management permissions, defaulting to Administrators), where it's published (Placement, with a Manage sections link), who's listed as the author, and who can see it (Visible to, defaulting to Agents and admins until you widen it).
05Set visibility before you publish
The "Visible to" setting is the one worth double-checking every time: it defaults to Agents and admins, which keeps a new article internal-only until you deliberately widen it. If the goal is a self-service article customers can find on their own, change this to your public or signed-in-customer segment before publishing — otherwise you'll have written a perfectly good article that nobody outside your team can actually see.
06Publish and test the search
Once the content, placement, and visibility all look right, save and publish the article. Then go test it the way a real customer would: search the Help Center for the phrase you expect them to type, not the internal title you gave the article. If it doesn't surface easily, add a few more content tags or adjust the title's wording — a knowledge base article that's accurate but unfindable saves nobody any support time.
Frequently asked questions
What's the difference between a category and a section in Zendesk Guide?
A category is the top-level grouping customers browse first, like "Product Information" or "Billing." Sections sit underneath a category and break it down further, like "Setup" or "Troubleshooting" within Product Information.
Why can't customers see my new knowledge base article?
Check the "Visible to" setting in the Article settings panel — new articles default to Agents and admins only, so they stay internal until you widen visibility to your public or customer segment.
Who can edit or publish knowledge base articles?
That's controlled by the Management permissions setting in Article settings, which defaults to Administrators but can be opened up to other permission groups depending on how your team is set up.
Do I need to set up categories before writing articles?
It helps. Categories and sections give your Help Center a structure customers can browse, and it's easier to place a new article into an existing structure than to reorganize a flat pile of articles later.
How do I know if my knowledge base articles are actually findable?
Search the Help Center yourself using the phrases a customer would realistically type, not your internal article title. If the article doesn't surface easily, adjust its title or add more content tags.
About the author

Impran M N
I've been hooked on technology for as long as I can remember — especially the new tools and AI apps that seem to land every other week. Easy Tech Tuts is where I write up whatever I've just worked out: I do the task in the real product, record the screen, and turn it into the guide I wish I'd found first.