Easy Tech Tuts
How to Reconcile Credit Card in QuickBooks Online Easily 2026
By Impran M N
Credit card reconciliation is what keeps your books aligned with what your statement actually says, and QuickBooks Online handles it through one dedicated Reconcile screen shared by every account type — bank, credit card, or otherwise. This guide walks through opening that screen, entering your statement's beginning and ending balances correctly, and adding any finance charge before you start matching transactions. It's aimed at small business owners and accountants who want a clean monthly close without second-guessing which numbers go where.
01Get to Reconcile from the gear menu
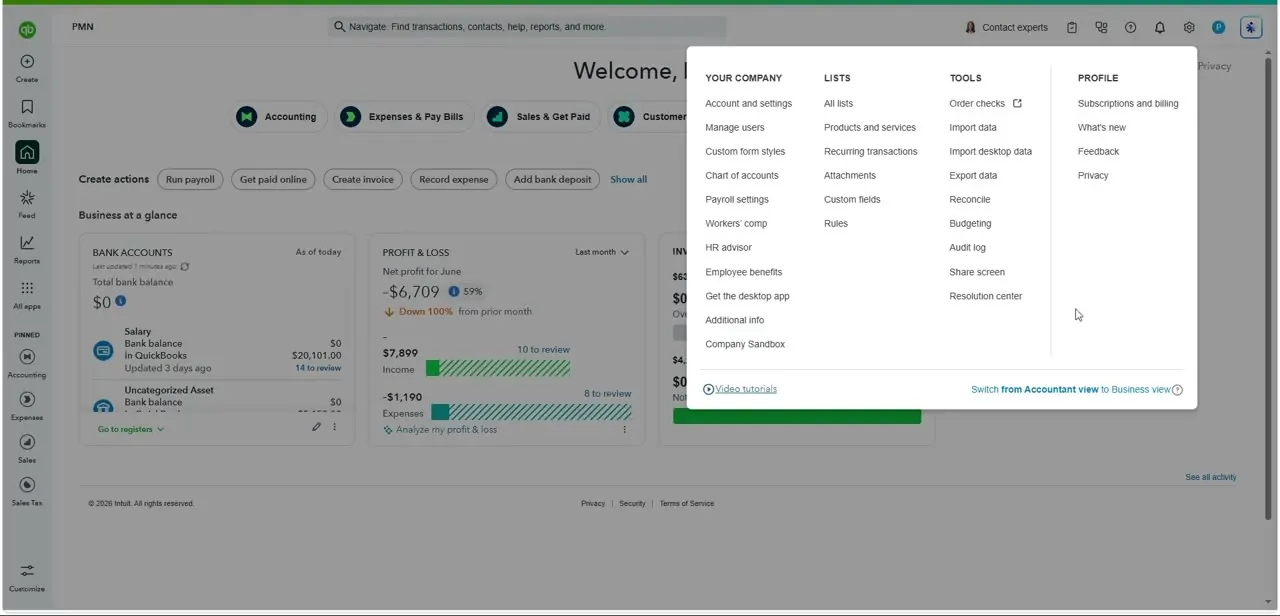
From the QuickBooks Online dashboard, click the gear icon in the top right to open the settings menu. Under the Tools column you'll find Reconcile, sitting alongside related tools like Budgeting, Audit log, and Import/Export data. This is the fastest route to the reconciliation screen — quicker than digging through the Accounting menu on the left if you already know where it lives.
02Select your credit card account
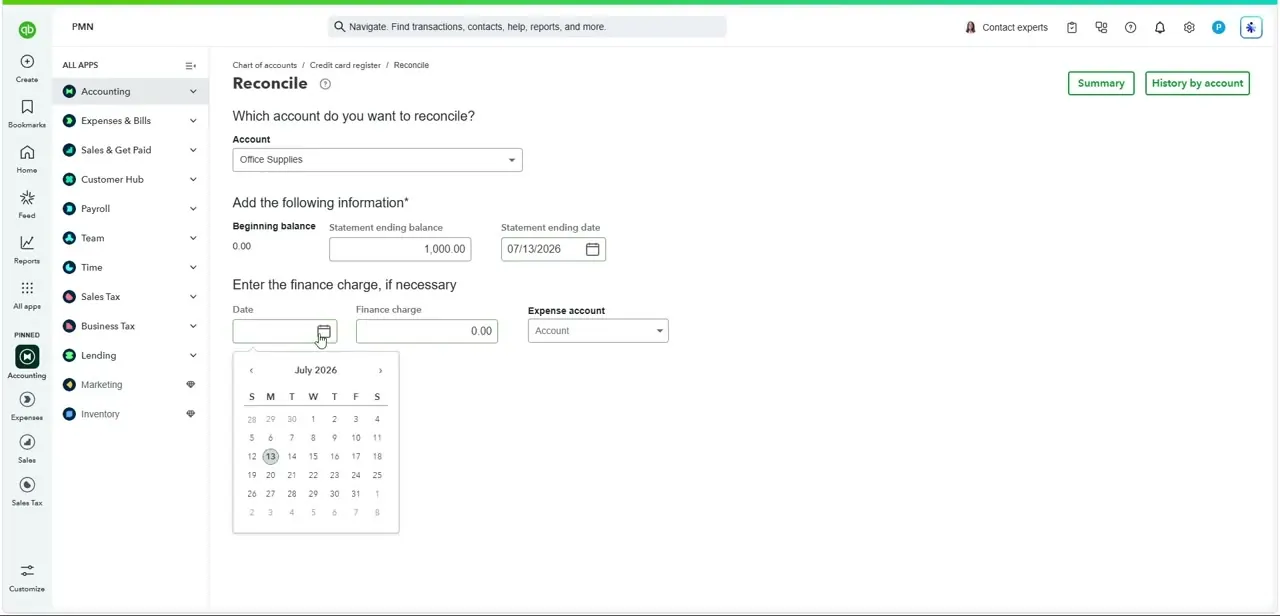
On the Reconcile screen, the first field asks "Which account do you want to reconcile?" — click the Account dropdown and choose your credit card account rather than a bank or expense account. The screen itself is generic across account types, so it's worth double-checking you've picked the credit card before entering numbers, especially if your chart of accounts has several similarly named entries.
03Enter your statement's beginning and ending balances
QuickBooks fills in the Beginning balance automatically based on your last reconciliation — leave it alone unless you have a specific reason to believe it's wrong. Type the Statement ending balance exactly as it appears on your actual credit card statement, along with the Statement ending date. Getting this pair of numbers right matters more than anything else on this screen, since every transaction you check off afterward is measured against this ending balance.
04Add any finance charge from the statement
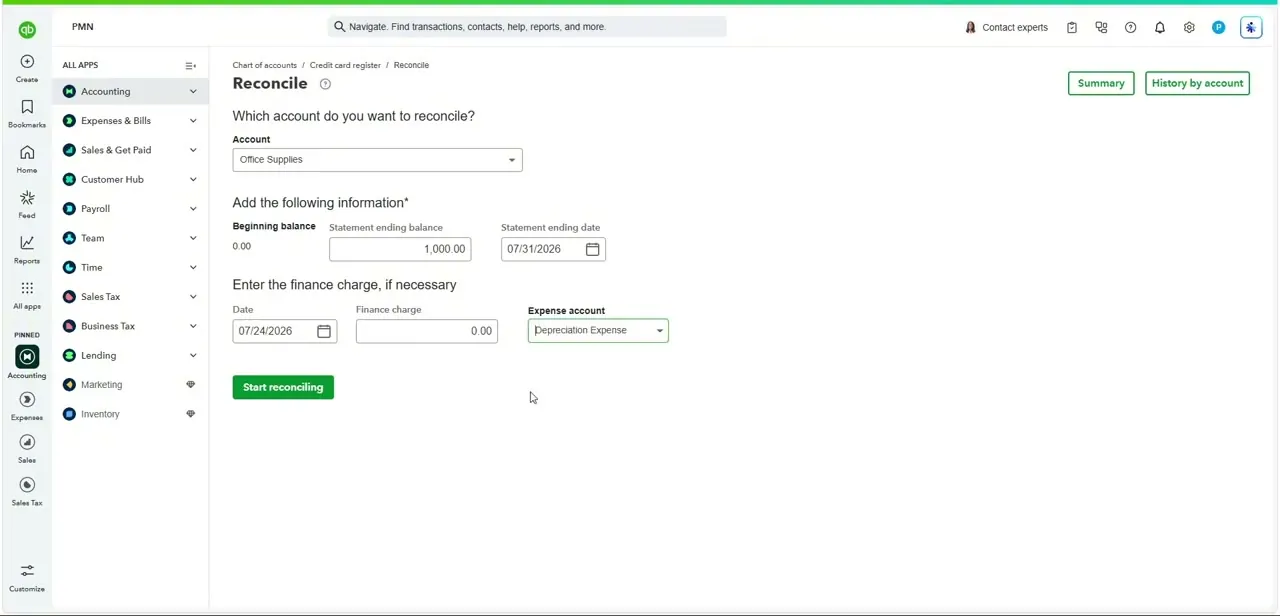
If your statement includes interest or a finance charge, enter its date and amount in the "Enter the finance charge, if necessary" section, then pick the right Expense account from the dropdown — QuickBooks defaults to whatever account was last used here, so confirm it's actually your interest expense account rather than something unrelated like Depreciation Expense before moving on. Skipping this when a charge exists is one of the most common reasons a reconciliation won't balance at the end.
05Start reconciling and match each transaction
Click Start reconciling and QuickBooks opens a list of every transaction posted to the account since your last reconciliation. Work down the list checking off each one that appears on your statement — QuickBooks tallies a running difference at the bottom, which should land at exactly zero once every real transaction is checked. Many entries will already show a suggested match if you've connected the card for bank feeds, which speeds this step up considerably compared to checking everything by hand.
06Track down any discrepancy before you finish
If the difference isn't zero when you've checked off everything that matches, don't force it closed — that just buries the error instead of fixing it. Common causes are a transaction entered twice, one missing entirely, or a wrong amount typed in manually; sort the transaction list by amount or date to spot duplicates faster. Once the difference reads zero, finish the reconciliation, and treat that closing balance as locked — editing a reconciled transaction later will throw off every reconciliation that came after it.
Frequently asked questions
Why is credit card reconciliation important in QuickBooks Online?
Reconciling confirms your records match your actual credit card statement, which catches duplicate or missing transactions before they distort your expense reporting or taxes.
What should I do if a transaction doesn't match my statement?
Leave the reconciliation open and investigate rather than forcing it to balance — sort the transaction list by amount or date to spot a duplicate, a missing entry, or a mistyped figure.
Where is the Reconcile tool in QuickBooks Online?
Click the gear icon in the top right and look under the Tools column — Reconcile sits there alongside Budgeting and the Audit log.
Can I edit a transaction after it's been reconciled?
You can, but it will change the balance in every reconciliation done after it, so it's best avoided unless you're prepared to redo subsequent reconciliations.
Is this process beginner-friendly for new QuickBooks users?
Yes — the Reconcile screen walks you through the same beginning balance, statement ending balance, and finance charge fields regardless of account type, so the steps here apply the first time you use it and every time after.
About the author

Impran M N
I've been hooked on technology for as long as I can remember — especially the new tools and AI apps that seem to land every other week. Easy Tech Tuts is where I write up whatever I've just worked out: I do the task in the real product, record the screen, and turn it into the guide I wish I'd found first.