Easy Tech Tuts
How to Automatically Save Email Attachments to SharePoint With Power Automate Easily 2026
By Impran M N
Manually pulling attachments out of email and dropping them into SharePoint is one of those small chores that quietly eats a chunk of every week. Power Automate replaces it with a flow that watches your inbox and saves matching attachments the moment they arrive. This guide follows a real automated flow — built around a "When a new email arrives (V3)" trigger filtered to a specific subject line — so you can see the actual trigger configuration and the inbox it's watching, not just a generic description of the steps.
01Find your existing flows or start a new one
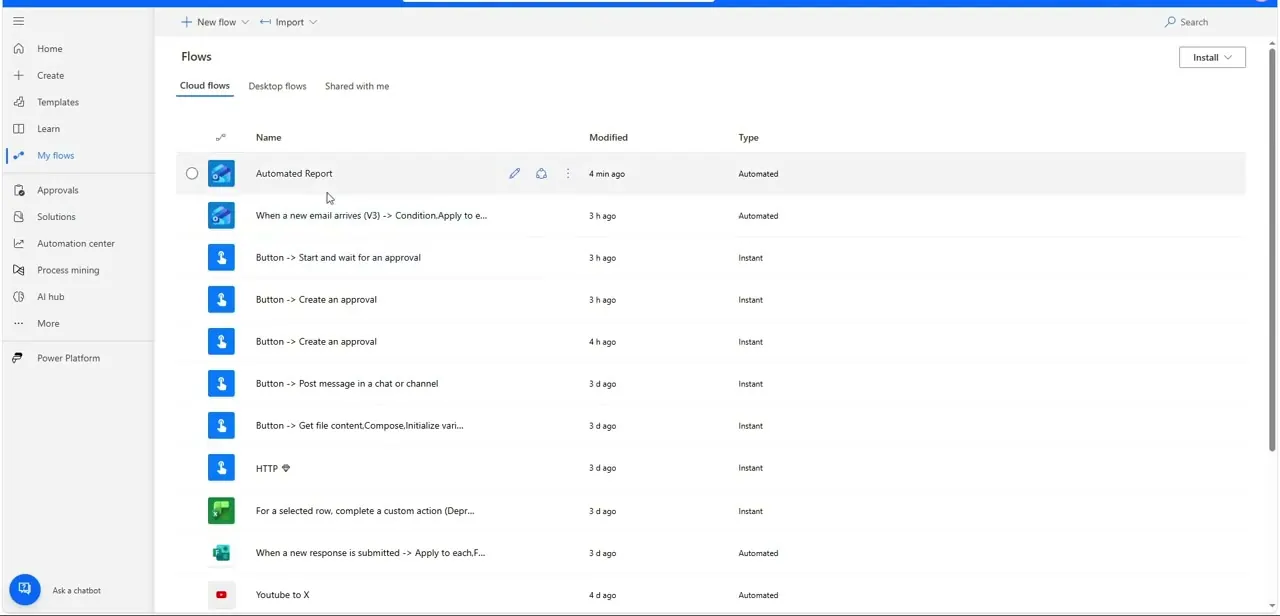
Open My flows in Power Automate to see everything you've already built, listed with a Name, Modified date, and Type column. In a working account this list fills up fast — automated flows, instant button-triggered flows, scheduled ones — so it's worth naming things clearly, as seen with entries like "Automated Report" and "When a new email arrives (V3) -> Condition Apply to e..." which describe what they do at a glance. To start a fresh flow for saving attachments, use New flow and choose an automated cloud flow, since this needs to fire on an event (a new email) rather than a fixed schedule.
02Configure the When a new email arrives trigger
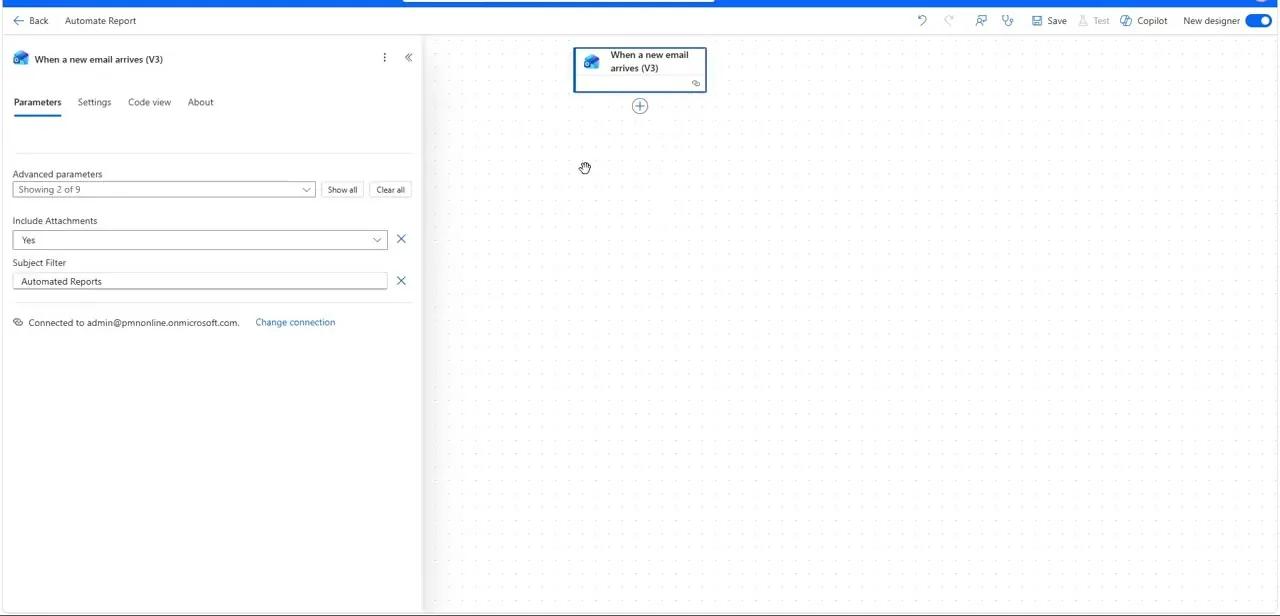
The trigger block, "When a new email arrives (V3)," connects to your Outlook mailbox and exposes a set of Advanced parameters beyond the basic folder and sender fields. Two matter most here: Include Attachments, set to Yes, which is what makes the attachment data available to later steps at all, and Subject Filter, set to a value like "Automated Reports," which narrows the trigger so it only fires for emails matching that subject instead of every message that lands in the inbox. Filtering by subject (or sender, or folder) up front keeps the flow from processing irrelevant mail and wasting runs.
03Confirm what the trigger is actually watching
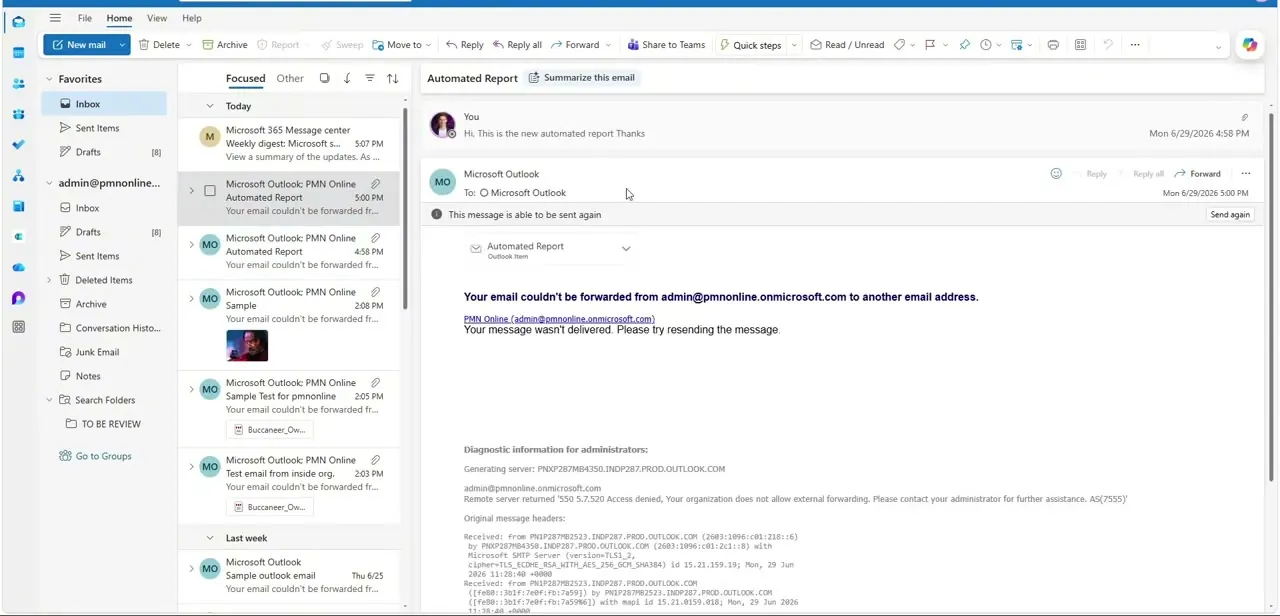
It helps to look at the real inbox the flow is connected to before trusting the automation. In this account, the Outlook inbox shows a thread of test emails with the subject "Automated Report," sent to confirm the trigger fires as expected — exactly the kind of matching subject line the Subject Filter parameter was set to catch. Sending yourself a test email with the target subject and attachment before going live is the fastest way to confirm the trigger condition is set up correctly.
04Extract the attachments and loop through them
Once the trigger fires, add a step to pull the attachments out of the email body — Power Automate exposes them as a collection you can loop over with an Apply to each control, which matters because a single email might carry more than one file. Inside that loop, each attachment gives you its file name and content, which is exactly what the next step needs to write it somewhere else.
05Save each attachment to a SharePoint document library
Add the "Create file" action for SharePoint, point it at your target site and document library, and map the attachment's file name and content into it. If you want attachments organized rather than dumped into one folder, add a condition before the Create file step that checks the sender or subject and routes the file into a matching subfolder — for example, reports from one sender going into a "Finance" folder and another sender's into "Operations."
06Guard against duplicate files
Re-sent emails or slightly different messages with the same filename can otherwise overwrite or clutter the library. Add a check — either a "Get file metadata" call against the target folder or a simple existence check — before the Create file step, and if a match is found, append a timestamp or a counter to the filename rather than skipping the save outright, so nothing gets silently lost.
Frequently asked questions
Can I filter which emails trigger the flow?
Yes. The trigger's Advanced parameters include a Subject Filter (and options for sender or folder), so only matching emails start the flow instead of every message in the inbox.
What happens if an email has multiple attachments?
Wrap the SharePoint save step in an Apply to each loop over the email's attachments collection, so every file in the email gets processed and saved individually.
How do I avoid saving duplicate files?
Add a file-existence check against the target SharePoint folder before the Create file step, and append a timestamp or counter to the filename if a match is found.
Can attachments be organized into different folders automatically?
Yes. Add a condition based on sender or subject before the Create file step to route attachments into different SharePoint folders.
Do I need Include Attachments turned on for this to work?
Yes. The email trigger's Include Attachments parameter must be set to Yes, or the flow won't have access to the attachment data at all.
About the author

Impran M N
I've been hooked on technology for as long as I can remember — especially the new tools and AI apps that seem to land every other week. Easy Tech Tuts is where I write up whatever I've just worked out: I do the task in the real product, record the screen, and turn it into the guide I wish I'd found first.